Sunday, November 29, 2015

Creating a custom LDAP structure with Apache Directory Studio

The Lightweight Directory Access Protocol (LDAP) is an application protocol for accessing and maintaining distributed directory information services over an Internet Protocol (IP) network. More info about LDAP.
  • Download Apache Directory Studio (ADS) Tutorial created with 2.0.0 version. 
  • Run ADS.
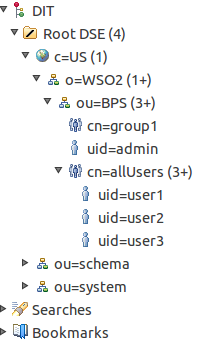
  • Lets assume that we need to create a LDAP structure looks like below example

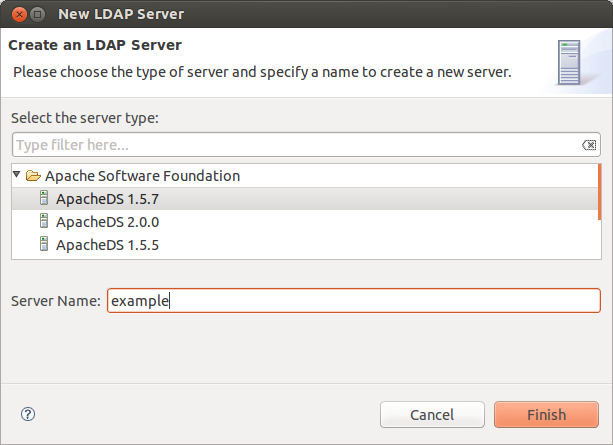
  • First you have to create a LDAP server
  • In ADS window at bottom left corner, go to LDAP servers tab right click inside the panel > New > New server.

  • Select the server version, enter a name and click finish to create the server.

  • You will see the new server at the LDAP servers list.
  • Now if you observe the structure that we are going to create, it starts with the root c=US.
  • In-order to do this we have to create a partition with the suffix c=US inside the server we created.
  • Right click on the server we created in LDAP server list (caption 2) and click Open Configuration
  • In the opened server.xml file, go to the partition section by clicking the partition tab at the bottom of the page.
  • Click add button and give a name to ID and set the suffixc=US.
  • Save the settings (ctrl+s).

  • Now go to LDAP server list (caption 2). Right click on the server and click Run.
  • Again right click on the server and click Create a connection.
  • Go to the Connections tab (next to the LDAP servers tab , caption 2)
  • You will see a new connections has been created with the server name.
  • Double click on the new created connection. It will open the LDAP structure in the LDAP browser.

  • Now we can start creating the LDAP structure.
  • First we'll create the country inside the root.
  • Right click on the Root in LDAP Browser and click New > New Entry...
  • In the new window select Create entry from scratch and click Next.
  • Form the Available object classes select Country and by clicking the Add button add it to the Selected object classes. Click Next.
    • Note that it will add the dependent objects automatically. Do not remove them.
  • Keep the parent empty since this will be the root and fill RDN values c and US

  • Click Next and then click Finish.
  • You will now see the c=US root element in the LDAP browser.
  • Now let's create the organization unit as BPS.
  • Right click on the o=WSO2 element in LDAP Browser and click New > New Context Entry...
  • In the new window select Create entry from scratch and click Next.
  • Form the Available object classes select OrganizationalUnit and by clicking the Add button add it to the Selected object classes. Click Next.
    • Note that it will add the dependent objects automatically. Do not remove them.
  • For the DN pattern enter ou=BPS,o=WSO2,c=US and click Next and Finish
  • Now we can add the admin user to BPS.
  • Right click on the ou=BPS element in LDAP Browser and click New > New Context Entry...
  • In the new window select Create entry from scratch and click Next.
  • Form the Available object classes addOrganizationalPerson, uidObject to the Selected object classes. Click Next.
    • Note that it will add the dependent objects automatically. Do not remove them.
  • For the DN pattern enteruid=admin,ou=BPS,o=WSO2,c=US and click Next.
  • Set the same value admin to cn and sn by right clicking on those attributes and select Edit value

  • Click Finish after setting all the values as shown in the above caption.
  • Note that we are unable to create groups without having at least one user. Now since we have at least one user created in the LDAP structure we can start creating groups.
  • Right click on the ou=BPS element in LDAP Browser and click New > New Context Entry...
  • In the new window select Create entry from scratch and click Next.
  • Form the Available object classes add groupOfNames to the Selected object classes. Click Next.
    • Note that it will add the dependent objects automatically. Do not remove them.
  • For the DN pattern entercn=allUsers,ou=BPS,o=WSO2,c=US and click Next
  • There will be a new popup window asking to enter at-least one member to the group.
  • Give the admin user DN patter (uid=admin,ou=BPS,o=WSO2,c=US) and click OK.


  • Click Finish after setting all the values as shown in the above caption.
  • Lets create another group named as group1.
  • Right click on the ou=BPS element in LDAP Browser and click New > New Context Entry...
  • In the new window select use existing entry as template and make sure it has mentioned the correct DN patter for the existing group allUsers. Click Next.
  • Note that the objects has been already loaded to theSelected object classes since we are using the settings from allUser group. Click Next.
  • For the DN pattern entercn=group1,ou=BPS,o=WSO2,c=US and click Next.
  • Keep the rest of the settings as it is and click Finish.
  • Now lets create some users in allUsers group.
  • Right click on the uid=admin element in LDAP Browser and click New > New Context Entry...
  • In the new window select use existing entry as template and make sure it has mentioned the correct DN patter for the existing user admin. Click Next.
  • Note that the objects has been already loaded to theSelected object classes since we are using the settings from admin user. Click Next.
  • For the DN pattern enteruid=user1,cn=allUsers,ou=BPS,o=WSO2,c=US and click Next.
  • Set the same value user1 to cn and sn by right clicking on those attributes and select Edit value.
  • Click Finish after setting all the values.
            • Repeat the same steps to create more users. Create user2 and user3.
            • Now lets add user2user3 to group1.
              • Click on the group1 from the LDAP browser. The settings will open in the right side window.
            • Right click on the empty space and select New Attribute.
            • In the new window set member for the attribute type and click Finish.
            • In the new popup window enter the DN pattern for user1 as   uid=user2,cn=allUsers,ou=BPS,o=WSO2,c=US.
            • Repeat the above 4 steps to add user3 to group1 as well.

            • Congratulations !! You have created the LDAP structure.  
            • After creating an LDAP structure, if you want to backup the data, you can always right click on the Root element in LDAP browser and select Export as a ldif file. Then next time you can Import them in the same way after creating the partition (c=US in this example) in the server with the suffix

            Wednesday, September 9, 2015

            WSO2 ESB IP address whitelisting with Throttle mediator

            The following configurations will show you how to whitelist set of IP addresses (range) using ESB Throttle mediator with an embedded WS-Policy.

            For an instance let say you need to secure a specific ESB API resource by whitelisting a set of IPs.
            • Call the ESB Throttle mediator as soon as the API resource get's in to inSequence as shown below.
            <?xml version="1.0" encoding="UTF-8"?>
            <api xmlns="http://ws.apache.org/ns/synapse"
                 name="ipWhitelistingSample"
                 context="/whitelisting-ip"
                 hostname="localhost">
               <resource methods="GET" uri-template="/access">
                  <inSequence>
                     <throttle id="A">
                        <policy key="conf:/policy/policy.xml"/>
                        <onReject>
                           <log level="custom">
                              <property name="text" value="**Access Denied**"/>
                           </log>
                           <property name="HTTP_SC"
                                     value="401"
                                     scope="axis2"
                                     type="STRING"
                                     description="HTTP_SC_401"/>
                           <property name="RESPONSE"
                                     value="true"
                                     scope="default"
                                     type="STRING"
                                     description="RESPONSE"/>
                           <respond/>
                        </onReject>
                        <onAccept>
                           <log level="custom">
                              <property name="text" value="**Access Granted**"/>
                           </log>
                           <payloadFactory media-type="xml">
                              <format>
                                 <status>OK</status>
                              </format>
                              <args/>
                           </payloadFactory>
                           <respond/>
                        </onAccept>
                     </throttle>
                  </inSequence>
                  <outSequence/>
                  <faultSequence/>
               </resource>
            </api>
            • In the above example I have referenced the WS-Policy from a resource file from the registry.
            • On accept you can call another sequence or write the work inline itself.
            • On reject we send a response back to the client stating "Unauthorized".
            • The sample WS-Policy looks like below.
            <wsp:Policy xmlns:wsp="http://schemas.xmlsoap.org/ws/2004/09/policy"
                        xmlns:wsu="http://docs.oasis-open.org/wss/2004/01/oasis-200401-wss-wssecurity-utility-1.0.xsd"
                        xmlns:throttle="http://www.wso2.org/products/wso2commons/throttle"
                        wsu:Id="WSO2MediatorThrottlingPolicy">
                <throttle:MediatorThrottleAssertion>
                    <wsp:Policy>
                        <throttle:ID throttle:type="IP">192.168.10.10 - 192.168.10.20</throttle:ID>
                        <wsp:Policy>
                                 <throttle:Allow/>
                        </wsp:Policy>
                    </wsp:Policy>
                    <wsp:Policy>
                      <throttle:ID throttle:type="IP">other</throttle:ID>
                      <wsp:Policy>
                        <throttle:Deny/>
                      </wsp:Policy>
                    </wsp:Policy>
                </throttle:MediatorThrottleAssertion>
            </wsp:Policy>
            
            • According to above configurations, Throttle mediator will only allow access to IP addresses within the range of 192.168.10.10 to 192.168.10.20. Every other request that comes from different IPs will get denied to pass through.
            Note: Let's say you have multiple IP addresses (2) that need to pass through but do not want to allow all the IP addresses within the range to pass through. In that case you can define 2 "<wsp:Policy>" tags and define "Allow" access to them. 

            Ex: 
            <wsp:Policy>
                <throttle:ID throttle:type="IP">192.168.10.12</throttle:ID>
                <wsp:Policy>
                         <throttle:Allow/>
                </wsp:Policy>
            </wsp:Policy>
            <wsp:Policy>
                <throttle:ID throttle:type="IP">192.168.10.18</throttle:ID>
                <wsp:Policy>
                         <throttle:Allow/>
                </wsp:Policy>
            </wsp:Policy>
            <wsp:Policy>
                <throttle:ID throttle:type="IP">other</throttle:ID>
                <wsp:Policy>
                         <throttle:Deny/>
                </wsp:Policy>
            </wsp:Policy>
            
            Further reading:
            Happy Coding!!

            Friday, August 21, 2015

            Apache Commons Logging troubleshoot for WSO2 servers

            Have you encountered a situation where Apache Commons Logging doesn't work for your new project/module when running in WSO2 servers? Here's the troubleshoot.
            • Make sure you have the maven dependencies.
            • If you choose to have a different package name other than starting with "org.wso2.carbon" then you need to configure it in the <CARBON_HOME>/repository/conf/log4j.properties file.
              • Lest assume your new project package name is "com.my.example"
              • For debug logs, add the below line to log4j.properties file.
                • log4j.logger.com.my.example=DEBUG

            Cheers!! Happy coding!

            Monday, August 10, 2015

            Creating new Oracle database and connecting it with WSO2 products

            When we deal with oracle, creating a new database means creating a new user to hold the tables, therefore let's first create a new user in the oracle database and then connect the bps product as an example.
            • Connect to the oracle database using the following command.
              • CONNECT sys AS sysdba;
              • Enter the password when requested.
            • Now let's create a new user with the name "bps" and password "password".
              • CREATE USER bps IDENTIFIED BY password;
            • Now in-order to create tables we must first grant permission to newly created user using the below command.
              • GRANT ALL PRIVILEGES TO bps;
            Now Let's connect the BPS product to newly created oracle user.
            • Modify the below parameters in <BPS_HOME>/repository/conf/datasources/bps-datasources.xml as follows.
                                <url>jdbc:oracle:thin:bps@localhost:1521/xe</url>
                                <username>bps</username>
                                <password>password</password>
                                <driverClassName>oracle.jdbc.driver.OracleDriver</driverClassName>
                                <validationQuery>SELECT 1 FROM DUAL</validationQuery>
              • Leave the other parameters as it is.
            • Copy the ojdbc.jar to  <BPS_HOME>/repository/components/lib/ folder.
            • Restart the BPS server with -Dsetup.
              • sh wso2server.sh -Dsetup

            Cheers !!

            Wednesday, July 8, 2015

            WSO2 Business Process Server - BPEL Correlation Tutorial

            The following screen cast will guide you step by step explaining what is BPEL correlation, 
            how to implement it using WSO2 Developer Studio and finally how to run it using BPS server.


            Happy coding !!

            Friday, May 8, 2015

            Installing WSO2 certificate into JVM default certificates in Linux

            There are mainly two steps to follow in this process.
            • Creating a certificate (mycert.pem) file using wso2carbon.jks
            keytool -export -alias wso2carbon -keystore /home/wso2is-5.0.0/repository/resources/security/wso2carbon.jks -storepass wso2carbon -file /home/mycert.pem 
            • Installing the created certificate (mycert.pem) to the JVM default certificates
            keytool -import -alias wso2carbon -file /home/mycert.pem -keystore /home/Software/jdk1.7.0_79/jre/lib/security/cacerts -storepass changeit

            By default changeit string is the JVM default store password
            (unless you have change it).

            Linux grep all running processes for a given port and kill them

            Open a terminal and type the command:
            • netstat -anp | grep 8080
            Replace 8080 with your desired port.

            You will get a result like below
            • tcp6     0     0 :::8080      :::*     LISTEN      6903/java 
            The 6903 is your process id.

            Optionally if you want to kill this process, type the command
            • kill -9 6903

            Tuesday, April 28, 2015

            How to quickly access a H2 database

             
            Cheers !!!